Wee Animal Quilt Tutorial
Many of you have been asking for a tutorial ever since I posted my completed Animal Quilt back in the fall. Ask and I shall deliver! Please note that this is a free tutorial, and as such has not been pattern tested and may glaze over some finer skills, but wherever possible I have put a link to another reference if you need further assistance. If you find any errors in the pattern please let me know in the comments and I will correct them. Enjoy!

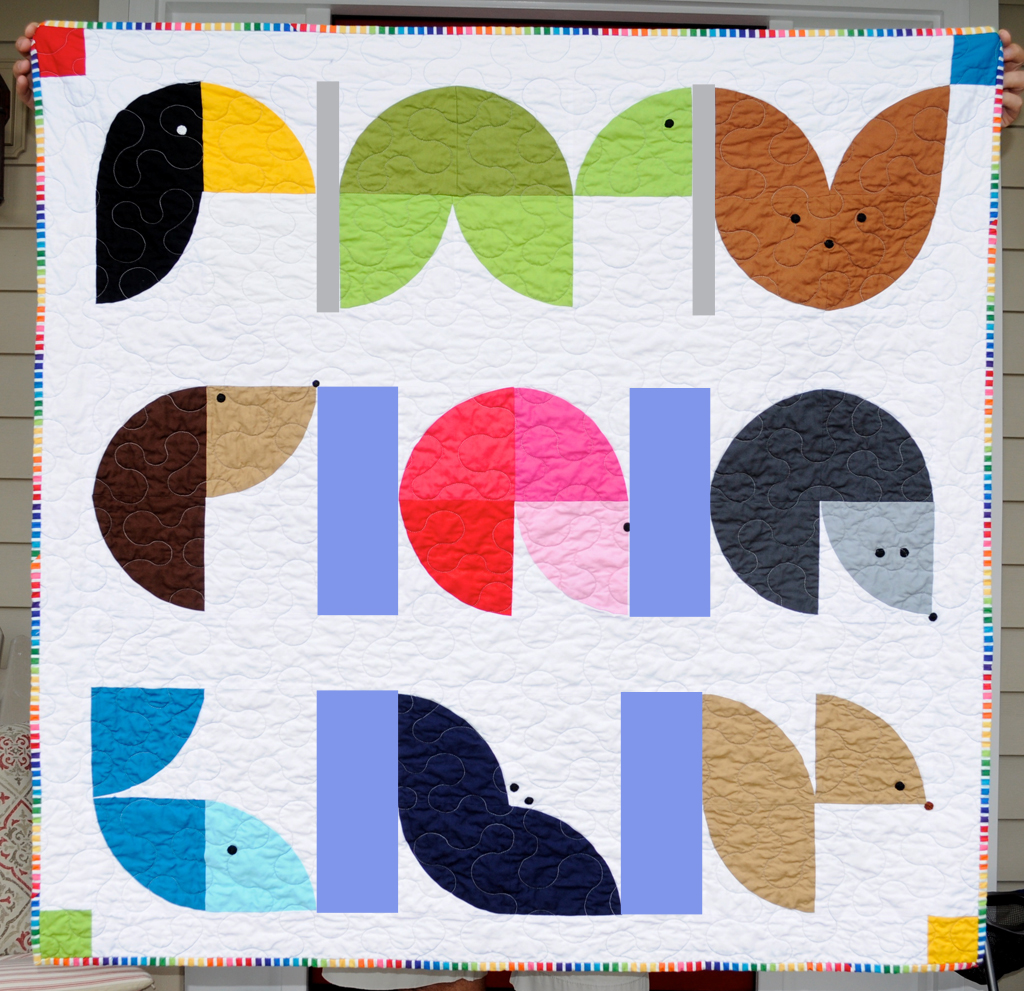
Wee Animal Quilt
Materials:
Solid Coloured Fat Eights, Quarters or Yardage (see Step 2 below regarding amounts)
Solid Background Fabric (a couple of yards)
Batting
Backing Fabric (2.75 yards)
Binding Fabric (1/2 yard)
Embroidery Floss
Paper Template, Acrylic Template or Accuquilt with Drunkards Path Die
Notes:
All seams are 1/4″
I used 2.25″ strips for my binding
Be careful when you are quilting over the eyes and noses – they are thick!
Finished quilt is approximately 45″ square.
Steps:
1. Plan your quilt: I suggest taking a few minutes with some paper and coloured pencils to figure out what you want your quilt to look like. There are tons of possibilities for different animals by changing the layout and colours of the quarter circles. Be creative!
2. Determine how many fat quarters you need: Each fat quarter will easily yield 9 coloured quarter circles, so you will definitely have some left over from each colour. You could also use fat eights, and you would get 3 from each of those. For this quilt I used:
Black
Yellow
Light Green
Dark Green
Dark Brown
Medium Brown
Light Brown
Red
Dark Pink
Medium Pink
Light Pink
Dark Grey
Light Grey
Navy Blue
Medium Blue
Light Blue
3. Cut out your quarter circle blocks: Print the paper template provided (make sure you print at 100% scale, and check that the 1″ mark is the right size to ensure your quilt ends up the same size as mine). As paper templates are the least accurate, I recommend purchasing a template such as this one. Using the quarter circle, cut out your required coloured pieces from your plan. Cut out the same number of reverse quarter pieces from your background fabric. Each coloured piece should have an opposing reverse piece in your background fabric. For this exact quilt you will need:
(2) Black
(1) Yellow
(3) Light Green
(2) Dark Green
(2) Dark Brown
(4) Medium Brown
(4) Light Brown
(1) Red
(1) Dark Pink
(1) Medium Pink
(1) Light Pink
(3) Dark Grey
(1) Light Grey
(3) Navy Blue
(2) Medium Blue
(1) Light Blue
(32) background fabric reverse quarter circles.

**If you have an Accuquilt Go, you can also use the drunkards path die to cut out your shapes. You will need much more fabric than is recommended above, as the dies do waste quite a bit of fabric. When you sew together your blocks you will notice that you have too much of the background fabric (the coloured quarter circle doesn’t take up the whole block. You just need to trim the extra background fabric off so that the block is 6″ x 6″, with just 1/4″ of the background fabric showing on the corners of the quarter circle**
4. Sew your quarter circle blocks: There are several methods available for sewing curves. You can pin your curved pieces together using Jacquie’s great tutorial, or if you are a little more daring, I highly recommend using this video tutorial from Leanne at She Can Quilt. Test it out with a couple of scrap pieces until you get the hang of it. Once you do, you will be flying along no problem! It is much faster than using pins.
5. Press your blocks: With whatever method you use, you will need to press your blocks. Be careful not to distort the fabric when you flip it over. It is easy for it to stretch because of the curve. Press from the back first, and press the background fabric towards the coloured fabric.
6. Trim your blocks: If needed, trim off any excess so that each block is exactly 6″ x 6″. (Remember, if you used the Accuquilt you will be trimming off quite a bit of background fabric.

7. Layout your quilt: On your design wall (or floor) layout your quilt into your animal shapes. You will need to cut some 6″ x 6″ background fabric squares to fill in the spaces on animals such as the toucan, squirrel, fish, etc, so that every animal is either made of 4 or 6 blocks. For this exact quilt you will need to cut (6) 6″ x 6″ background blocks.
8. Sew together your animals: Stitch together your 4 or 6 block animals, making sure to match points and seams. Press seams.
9. Layout your quilt for sashing: Layout your completed animals again, leaving a little space between them for vertical and horizontal sashing.
10. Add vertical sashing: If you are using a 6 block animal such as the turtle, that row of animals will require a smaller vertical sashing compared to the other rows. For this row cut (2) 11.5″ x 1.5″ vertical sashing pieces. For the remaining 2 rows, cut (4) 11.5″ x 4.25″ vertical sashing pieces. In the figure below, the grey rectangles show the narrow vertical sashing, and the blue shows the wide vertical sashing.
11. Assemble rows: Sew together your rows (animal, sashing, animal, sashing, animal). Press your seams. Each row should measure 11.5″ x 41″ when complete.
12. Cut horizontal sashing: Cut 2 pieces of horizontal sashing 4.25″ x 41″. The pink rectangles in the figure below show the horizontal sashing.

13. Assemble quilt top: Sew together the rows (row, sashing, row, sashing, row). Press your seams. Your quilt top should now measure 41″ x 41″.
14: Add borders: I added a 3″ border to mine, and also added corner blocks in leftover coloured pieces. Cut your corner pieces 3″ x 3″ and your (4) border pieces 3″ x 41″. Sew two corner blocks to the top border, and two to the bottom. Sew the side borders onto the quilt, and then the top and bottom borders. Press your seams. Your quilt top should now measure 46″ x 46″.
15: Add eyes/noses: Using a piece of chalk or a pencil, mark the location of the eyes and noses of your animals. I traced a 2″ circle, and that seemed to be proportional. Stitch these using embroidery floss in your choice of colours. I used a back stitch and started in the center, moving out until the eye was the size I wanted (2″).

16: Quilt and bind as desired!

*Please note – years after I made this quilt I finally determined the original creator of the image I found on Pinterest. It is line of kids clothes in Spain called Animodul. Please do not sell quilts made from this tutorial.*
13 Comments
Betty J. Johnson
Very cool quilt pattern! I love it!!
Barb in MI
Wow, I love your animal ‘drunkards path’ quilt!
There is a drunkard’s Path quilt along going on – would you mind me posting your Wee Animal photo on my blog with a link to your tutorial post above?
Dani
Thank you for asking first Barb! Yes please go ahead and post with the link! And if you get a second, could you send me some info on the QAL? (I’m sending you an email too) 🙂 Thanks!
Beth James
What a fun pattern! I just finished one for my grandson. Thank you. May I send you a picture?
Pingback:
Brandi
Thank you so much for providing this tutorial! I’m still new to quilting but decided to give this a go. Mine turned out well enough for me, but I’ll be working to make it better next time. My kids love it 🙂
Martha Cushman
https://www.pinterest.com/pin/19844054585929408/
Thanks for the pattern…many people commented on how cute it is!
Pingback:
Janie Kemp
Thank you so much for this fun quilt pattern and tutorial. I finally got it done this evening, and my little grandson loves it! My daughter does too. :0)
Janice Gorgoglione
Thanks for posting this pattern. It’s such a clever way to use drunkard’s path. I love it and can’t wait to make it.
Tarnya
We have lots of readers love this tutorial! It really is unique. Thank you again for sharing.
Pingback:
Pingback: